This process loads invoices from a comma-separated value (.csv) file to generate electronic invoices that are sent to TEA. When TEA receives the invoices, they are processed and sent to the state accounting system (ISAS) for payment. You can use a file generated by a process from your company's billing system or use a template provided by TEA.
Note: |
If you use the TEA template, you must enable macros in Excel. |
Use these instructions if you are going to use the TEA-provided template to upload your data. If you are using your own spreadsheet, see Formatting a .csv File.
The first step is to create a spreadsheet or .csv file for the application to read. Open the template. Make sure that all of the template below the headings is empty before starting.
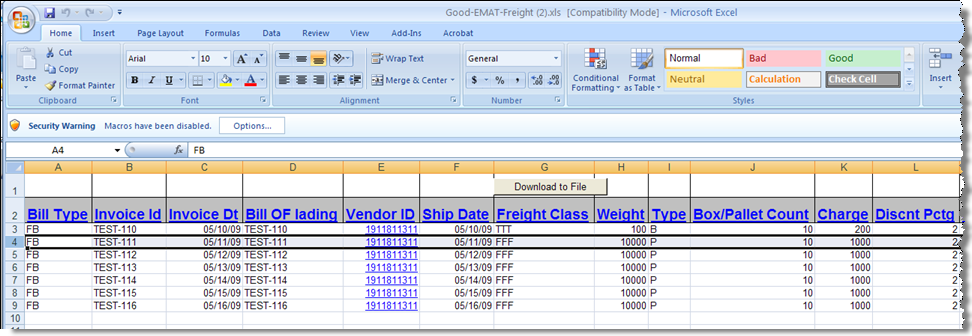
Enter or paste in the billing data starting on row 3, as shown in the example below:

After you have entered all the data, click the Download to File button at the top of the spreadsheet.

A confirmation message indicates the spreadsheet is saved to a the temporary folder on your local hard drive.

If you would like to export a .csv file from your billing system or manually create a file, you must create file according to the following structure. Do not use commas in the fields, because the system expects the fields to be separated by commas. Be sure to pay attention to the Len column, which tells you the maximum length of field values. The Comment column provides information about requirements for specific types of bills, etc.
Column Data |
Required? |
Type |
Len |
Comment |
Bill Type |
Yes |
Char |
2 |
FB=Freight Bill, CB=Correction Bill |
Invoice ID |
Yes |
Char |
30 |
Freight company invoice ID. FB must be unique; CB must reference a previous FB invoice. |
Invoice Date |
Yes |
Date |
8 |
Freight company invoice date in MM/DD/YY required on all bill types. This date will be used as the actual invoice date. The data loaded will be used as the Invoice Received Date which is used to calculate interest. |
Bill of Lading |
Yes |
Char |
20 |
Required on all bill types |
Vendor ID |
Yes |
Char |
10 |
Freight company state vendor ID required on all bill types |
Ship Date |
Yes |
Date |
8 |
Required in MM/DD/YY format for all bill types |
Freight Class |
Condition |
Char |
3 |
FAK required when weight is less than 10001 |
Weight |
Yes |
Nbr |
6 |
Number less than 10001=LTL (less than truckload); greater than 10000=TL (truck load) |
Type |
No |
Char |
10 |
B (box) or P (pallet) |
Box/Pallet Count |
No |
Nbr |
5 |
|
Charge |
Condition |
Amt |
5.2 |
Required for freight bill |
Discnt Pctg |
No |
Amt |
5.2 |
|
Discount Amount |
No |
Amt |
5.2 |
Must equal the Charge * Discount % |
Fuel Surcharge |
No |
Amt |
5.2 |
|
Accessorial Charge |
No |
Amt |
5.2 |
|
Net Charges |
Yes |
Amt |
5.2 |
On FB bill type, must be equal to the sum of the above amounts; can be negative on CB, but is limited to the maximum negative of the original FB |
Rate Per Mile |
Condition |
Nbr |
3.2 |
Required for TL |
Rate Per 100 Weight |
Condition |
Nbr |
3.2 |
Required for LTL |
Miles |
Yes |
Nbr |
5 |
|
Origin City |
Yes |
Char |
40 |
|
Origin Zip |
Yes |
Char |
10 |
|
Destination City |
Yes |
Char |
40 |
|
Destination Zip |
Yes |
Char |
10 |
|
Description |
Condition |
Char |
100 |
20-char comment required if the Net Charges are negative on a Correction Bill and/or Accessorial Charges are included |
Once you have your spreadsheet ready and saved to disk, follow these instructions to import the freight invoice data:
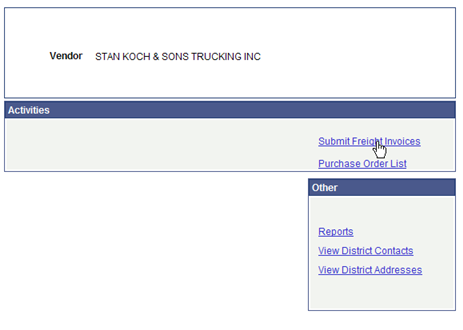
On the Start Page, click Submit Freight Invoices. The Vendor Freight Data File Import page is displayed.

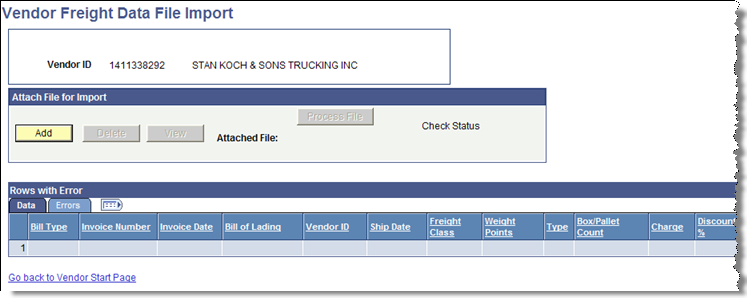
The Vendor Freight Data Import page appears:

Click the Add button. A browse box opens.

Click the Browse button and find your spreadsheet. Select the spreadsheet, and then click the Upload button.

Click the Process File button.

You can track the file's status by clicking on the Check Status link, which becomes after you press the Process File button. The process should only take a few seconds.
The View and Delete buttons are used to view the attached text file or delete the attached file.